Monday, February 29, 2016

Loveable Cherry Pie Heart Pops


It’s the last day in February, and so what am I doing? I’m giving you one… last… hearts and flowers post.  Well, more hearts than flowers. 

As I was browsing Pinterest for Valentine DIYs, I saw cherry pie pops with hearts cut out of the middle. 

I thought it would be cute to go one step farther, and make the whole pie pop into a heart.  Here’s how I did mine…


Items needed:
Pie Crust
Pie Filling
Lollipop Sticks
One Egg + water
Sugar
Chocolate Chips (optional)


First, preheat your oven to 350 degrees.

Then, roll out your pie crust.  To save time, I used store bought, but there’s nothing that says you can’t make your own. 

Next, take your heart cookie cutters, and start cutting the dough.  I used a 3” heart, but left room for four 2” hearts as well.


When I had them all cut and laid out, I had enough to make five 3” pops and two 2” pops.


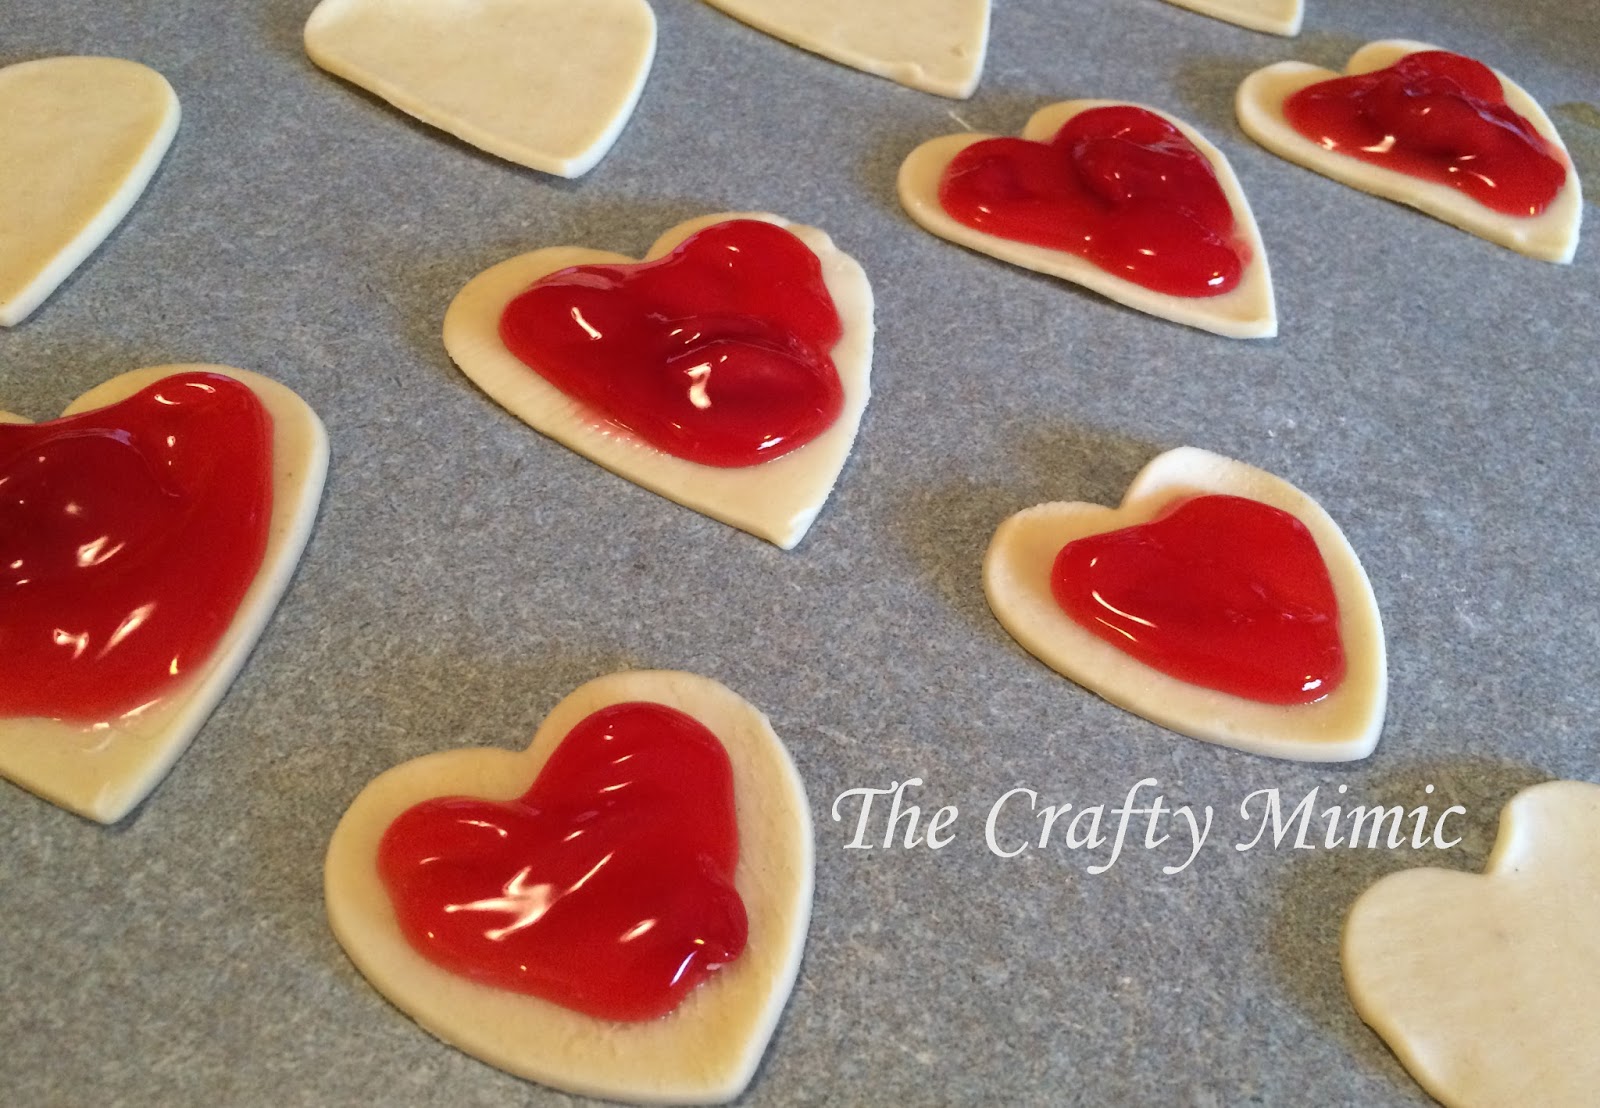
It’s time to spoon in the pie filling.  Not too much, or else it will seep out the sides when you place the heart on top.  Mine was mostly the liquid, but I made sure all the bigger pops had at least one cherry inside. 


When you’re done placing the filling on the hearts, make sure it’s back from the edge, close to ¼”.  This is so the two hearts will stick together without interference. 


Next, place the lollipop sticks on top of the filling.  Make sure to put the end close to the top, so the cherry pie pop won’t fall off when you pick it up. 


This is when I went a little crazy.  I wanted the little pops to be something different, something to take people by surprise.  That’s when I remembered the chocolate covered cherries that we give my in-laws for Christmas every year.  To be adventurous, I put chocolate chips in with the cherry pie filling on the smaller hearts.


Next, make your egg wash; one beaten egg and a splash of water.

Then brush the edges of all hearts with the egg wash, before placing one on top of the other.
 

Some filling may come out, but that’s no big deal. Wipe it up and move along.


To press the edges of the hearts together and give them that little extra flare, take a fork and push it into the crust around the edges.


Place pops on a parchment paper covered cookie sheet to prepare them to go in the oven.

For the final touches, brush tops with egg wash and sprinkle with sugar. Then cut a small “X” on the top of each one.


Place in the oven and bake for around 20 minutes.  Every oven is different, so be sure to check on them when the time gets close.

Take them out and enjoy.

These pops were so cute, and the perfect little treat to show my family how I love them with my “whole heart”.


*******Family Verdict************

Hubby & I:  We both thought that it needed a stronger tasting filling since there wasn’t that much in them.  We also agreed that Apple Pie would be delicious in the hearts.

10 year old: He said that I hit it out of the park with the chocolate ones.

6 year old: He wouldn’t stop eating them to tell me what he thought.

4 year old:  She decided that she didn’t like the color red that day, so she wouldn’t even try them.  She doesn’t count.

********************************

What do you think of this idea of pie on a stick?

It seems like SO many foods now a days are on sticks.  What is your favorite food on a stick?

As always, comment below.  We’d love to see your opinions.

Until next time…


Happy DIY-ing!!!

Tuesday, February 23, 2016

How to Make a Pompom Using Everyday Items


I saw the cutest Pompom heart wreath on Pinterest, and I knew that I had to make one.  However, first I had to learn how to make a pompom. 

I went through countless blogs, and I found people using so many different types of tools that were purchased specifically for making pompoms.  I didn’t want to spend the money, so I looked at what other people had found to use; common things around the house.   

Here’s what I found, how I made mine, and something new that I found to be easy and convenient.


The heart wreath I made came out so good, and making the pompoms was easier than I thought it would be.

Pompom Valentine Heart Wreath

Therefore when my kids saw the wreath and wanted pompoms of their own, I had no problem making them.  Plus, it was a perfect opportunity to show you all how I did it. 

The bigger ones were made using two empty toilet paper rolls.  Hold them together with one hand, and wrap the yarn around with your other.


**My picture shows two different colors, but you can do one or more if you’d like.**  

When you’ve got what you feel to be a significant amount of yarn wrapped around both rolls, gently slide it off one end, so it keeps its shape. 

Lay it on top of a long piece of yarn,


and tie the piece together with a knot. 


Flip over the yarn ball, and then tie it in a knot on the other side as well, for a more secure hold.


**I first tried to slide the piece of yarn in between the two toilet paper rolls and tie it without slipping it off, but it was too much of a hassle.  Sliding it off first worked best for me.**

Once you have your tied egg shaped ball of yarn, start cutting the loops around the outside.  This will give you the frayed pompom effect.


After I made the bigger green one, I made two smaller ones as well. 

With one, I used three of my fingers to wrap the yarn around.  However, when I cut through all the loops, I left the long piece of yarn that I used to tie together the loops untouched.  That way, it could be hung or tied onto something for decoration.

 
For my third pompom, I wanted to put a little spin on things, and find something different from what else was being used, but also something found very easily.  That’s right, I wrapped up my phone.


**The first time I wrapped it, I did it with the Otter Box cover still ON.  HUGE mistake.  That sucker wasn’t budging for the life of me when it was time to slide it off.  I had to eventually unwind the whole thing.  Fair warning: Take cover off first!**

Once all three pompoms were made, they were a straggly mess. 


Pressing down on the center to flatten the poms, I trimmed around the edges to make all pieces even.


I then shook them out and went through once again to trim any other pieces that stood out. 

After all the trimming was done, the pompoms were complete, and my kids loved there new “fluff balls”.  You can see below an estimated size of the larger one, so you can compare it to the other two. 


These are so cute.  You can have them as is, or you can use them to make other interesting things.

Click the link here to read how I made my Pompom Valentine Heart Wreath, and for a list of other cool items you can do with them. 

I hope you enjoyed this post.

What are some other things you can think of to wind yarn around to make pompoms?

Please comment below and share your opinions.

Until next time…


Happy DIY-ing!!!

Monday, February 22, 2016

Pompom Valentine Heart Wreath


For my daughters Valentine party, I need to make a big heart.  It was for a game, and the style was up to me.  The only criteria was that it had to be big enough for them to throw bean bags through.

I went at this with the thought that it would be just like making a heart wreath for Valentine’s Day, so I went to Pinterest. 

The rag style was really cute, but I had already done a rag wreath, and I was looking for something new. 

Wire Heart Wreath Form
Then, I saw the Pompom wreath. 

It was cute, it was simple, and I knew I had to do it. 


Items needed
Yarn Pompoms, big and small
Hot Glue
Cardboard
Scissors

The first thing I did was made my pompoms.  I didn’t want to spend any money on a specific tool for this, so I found unconventional ways to make them.  Click here to find out how I made my pompoms.


It was time to make the heart.  Take out your cardboard.  Lucky for me, we had just ordered a new treadmill, and it came in a large cardboard box, so I had plenty. 


Use your scissors and cut a large heart out of cardboard. Then cut a smaller heart out of the middle, so you have the outline of a heart. 


The first heart I cut was way too big, and so I ended up using the one I cut out from the middle.  Be sure to save your extra cardboard hearts.  You never know when you might need them.


Now, bring out all your pompoms and your hot glue gun.


Start with your bigger pompoms and lay out the design you want.


When you have it how you like, use your hot glue gun and glue them down on the cardboard. 


When I was done, it was cute, but it had gaps where you could easily see the cardboard.
 

This is where, I took my smaller poms and glued them sporadically around the wreath where they were needed the most. 

There, it was so cute when I was done.  Except when I picked it up, the cardboard was flimsy where I had folded it to cut my heart. 


I just glued a stabilizer piece of cardboard where it folded, and glued it on.


I then took some of my red yard, looped it around the front, and left the two ends long and untied.  That way, I could tie them to make the loop short so I could use it as a wreath, or longer so it could hang for a bean bag toss. 


I really enjoyed watching this wreath come together and now I have a great February decoration for my home. 

While doing my research, I found so many different thing that could be done with homemade pompoms.  Here are just a few…


And Much Much more!

With so many options, I wonder what MY next pompom project will be.  Stay tuned to find out!

Until then…

Happy DIY-ing!!!


Monday, February 15, 2016

Valentine Box Mania


It’s February!  You know what that means, don’t you?
Valentine Parties
Valentine Favors
Then of course there’s the Valentine Boxes!!


2016
This year, three of my kids needed boxes, and it was so much fun coming up with the things that matched their personalities.

We started off with three plain boxes,


and take a look at what they turned into…


The Chocolate Bar Valentine Box

Click here for how-to instructions.


The Leonardo Ninja Turtle Valentine Box

Click here for how-to instructions.


The Pink Valentine Mailbox

Click here for how-to instructions.


Comment below and tell me what you think, and please share any creative Valentine boxes that you've come up with.  We'd all love to see them. 

Until then...

Happy Holidays & 
Happy DIY-ing!!