Blackening your teeth to a whiter
smile!
Ok, I’m going to be completely honest
here.
I am not a big fan of my smile… even
though I love to do it!
My opinion of it isn’t as bad as it
used to be, but it’s still there none the less.
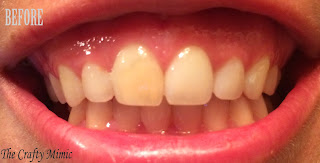
The nerves to my front tooth were
damaged at one point and now it has a yellow tint. My teeth aren’t pearly white, but that one
always sticks out like a sore thumb. For
the longest time it made me so self-conscious, but now I’m too comfortable with
myself to care.
However, I am always chasing after
the proverbial whitening care. I use
whitening toothpaste, but my teeth always stay the same. The gunk on the white strips annoy me, plus
the cost is outrageous.
This is why a comment I received on
my Charcoal Face mask post really got my attention. This person used activated charcoal to clean
and whiten their teeth.
I admit that I have seen this before,
but with all my issues about wanting whiter teeth, the thought about brushing
black powder all over them was a little terrifying. However, this person swore by it and the
great results that they got. With a
shrug and a deep breath, I tried it out.
I couldn’t be happier. My teeth
look and feel amazing.
Here’s what you’ll need:
Small Bowl
New Toothbrush
Water
That’s it!
There’s no need for any harsh
chemicals added with it. It works just
fine on its own.
I used two activated charcoal pills
and pulled them apart to dump the powder in the small bowl.
**Yes, it gets messy. Even after doing this numerous times, I still
get black all over my fingers.**
Grab your toothbrush.
**The charcoal doesn’t fully come out of the
brush when rinsed afterward, so you will want a new toothbrush or one that you
don’t plan on using again for everyday brushing.**
Rinse your toothbrush with water,
then place it in the charcoal. The water
will help adhere the charcoal to the brush.
Start brushing your teeth like
normal.
**When reading up on this, I saw that
someone suggested to not breathe in through your mouth while doing this so you
don’t choke down the powder. I didn’t
have a problem, but I could see how someone might. Good advice!**
Keep brushing.
If you think you need more charcoal,
place the brush once again in the small bowl and continue brushing.
Once you’ve brushed every last part
of your teeth, multiple times, let it sit for a minute.
Rinse.
Rinse some more. It will take a lot of rinsing to get all the
black off.
I recommend using your normal
toothbrush and toothpaste to get the remaining black residue off your
teeth. This will also help with the
little bit that’s hard to get from the crevices in between your teeth and
gums.
You should notice a difference right
away.
Two weeks after I tried this, I had a
dentist appointment and wanted his take on this whole thing. He told me that he had never read any studies
on it, but has heard of the health benefits from charcoal in the past. He didn’t see anything wrong with it, and
even the dental hygienist commented on how good my teeth looked and how little
she had to clean.
**Side note: I was told very firmly
to never use anything acidic (lemon, etc.) on my teeth and gums, natural or
otherwise. Those will damage your mouth
more than help it.**
Some things you need to know before
trying:
- This gets messy! Not just the breaking open of the pills. There is splatter from brushing and the gigantic mess from rinsing. It’s inevitable, but also easy to clean when all is said and done.
- I don’t recommend doing this every day or every other day. I know that after one time my gums were a little sore for a couple of days, but quickly went back to normal.
With those things in mind, I hope you
try this out for yourself and let me know what you think.
I was happy with my results, and definitely
plan on doing it again. I’m thinking once every couple of months to stay on top
of keeping them looking nice.
So far I have used activated charcoal
as a peel off face mask, and now as a teeth whitener. What other things have you used activated
charcoal for, and what did you think of the results?
Comment below to let me know!
Until next time…
Happy DIY-ing!!!


