Wednesday, April 27, 2016

Broadening Family Horizons; April 2016; RUTABAGA


I recently started this new idea with my family.  We are going to broaden our horizons and try something new to eat every month… 

I got the idea when I saw this…


and said, “What the heck is that?”

It’s a rutabaga, by the way; a root vegetable that’s a possible cross between the cabbage and the turnip. Thank you, Wikipedia.

When I asked around, if people had tried one or if they liked it, the answer to both questions was a resounding, “No.”

I didn’t care.  I was determined that my family would be able to say, “Yeah, I’ve had that.” Who knows, they might even like it. 

I researched many different ways to season and cook a rutabaga, and tried the way that look the best.


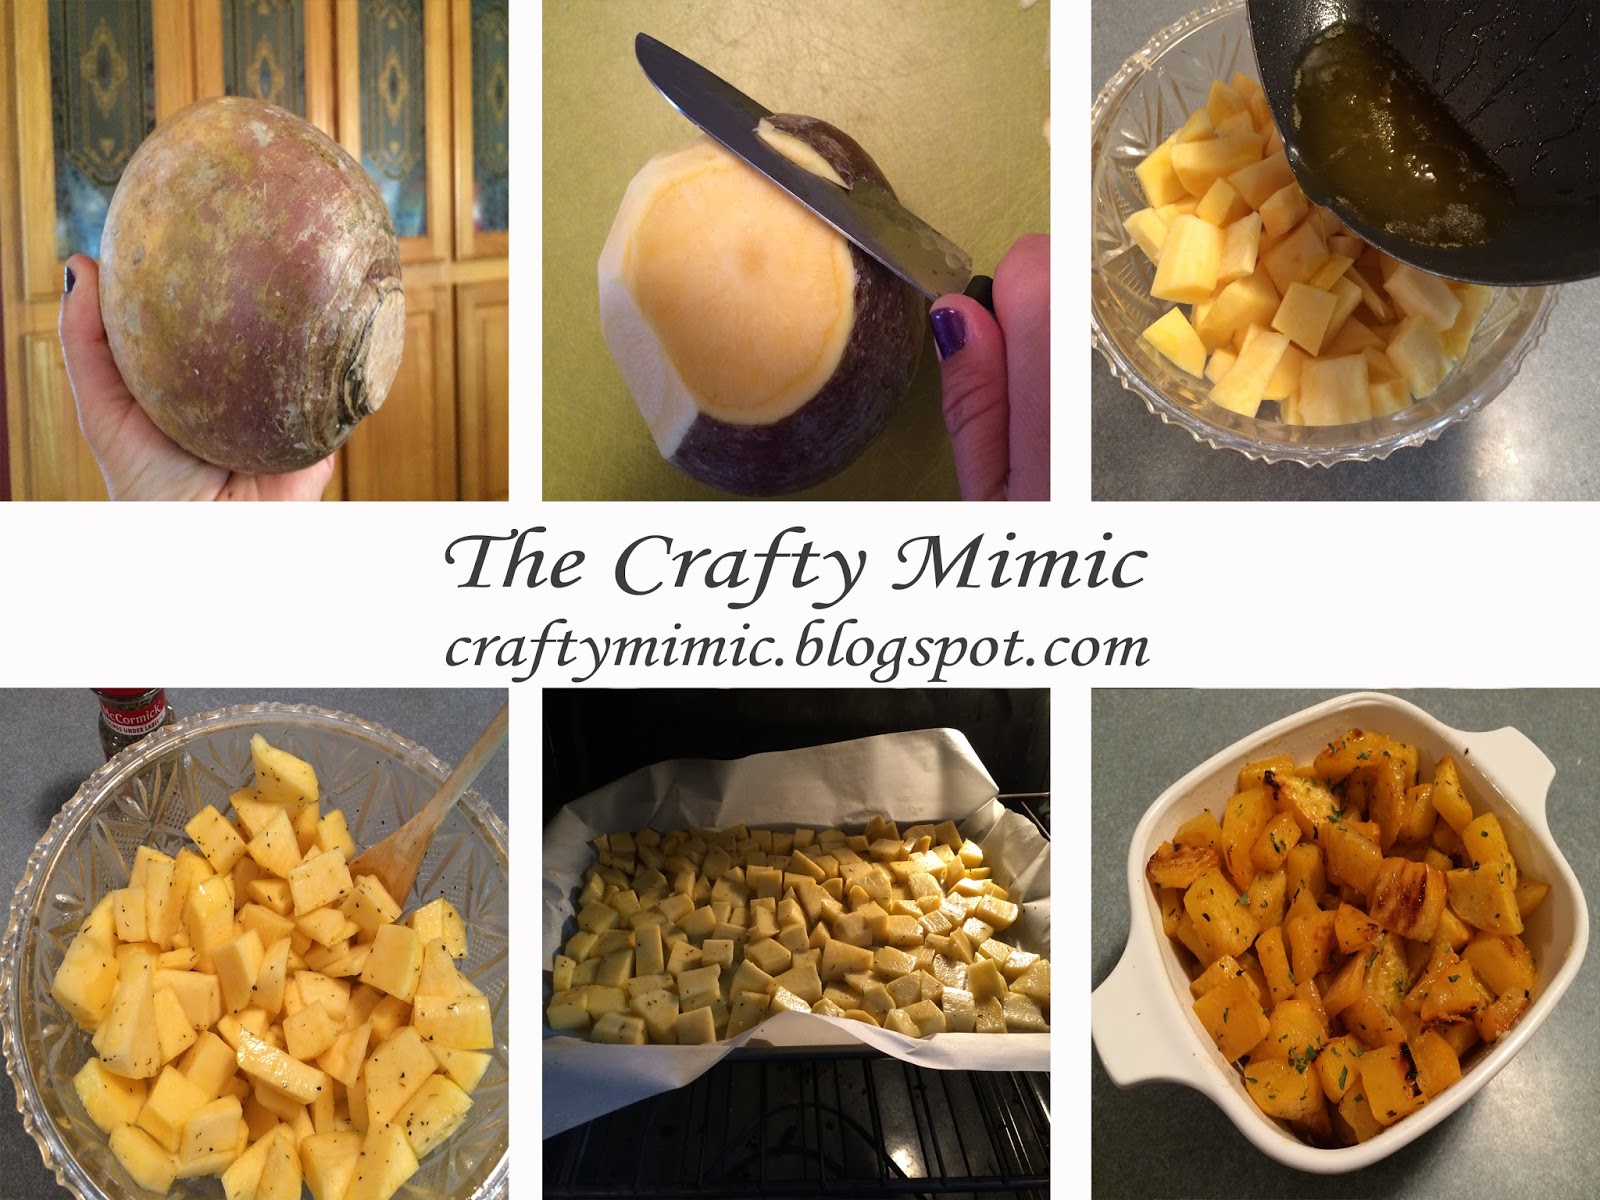
First I had to peel the sucker.  I read somewhere that peeling a rutabaga was easier than peeling a butternut squash (another thing I haven’t tried). Well, I don’t think I want to try and peel a butternut squash, because that rutabaga was a tough sucker to peel.  I eventually did it like a cantaloupe.  Cut off both ends and peel it down the sides. 

I chopped the peeled rutabaga into chunks. You can see the size of mine compared to the wooden spoon. Again… not so simple.


I browned some butter on the stove and poured it over the top.  Then I seasoned the chunks with Italian seasoning and salt, and tossed. 

I baked the rutabaga at 425 degrees for 35 minutes.  The chunks were tender and had browned nicely.

It was time for dinner…


*********Family Verdict*************

The pieces melted in our mouths, and the seasoning was good.  However, it was not enough to change the actual taste of the rutabaga, which we were all not fans of.

It was kind of a bummer, but there’s always that chance when trying something new that it won’t be a winner for you.

************************************

I’m curious as to what next month’s new food will be.  I guess I’ll know it when I see it.

Maybe leeks…

Maybe Brussels sprouts…

Anyone have any suggestions?

Until next time…

Happy DIY-ing!!!

Friday, April 22, 2016

Recycled Birdfeeder for Earth Day


This Earth Day...


That’s what I did. 

I used the last of my applesauce when I made the Double Chocolate Banana Minis, and was about to throw away the container when I saw the potential.  


What could be better than recycling trash, and doing something with it to help nature’s animals? A bird feeder…


I made sure to wash it out really well and remove the labels. 

I cut out the large opening for the birds, and also the smaller hole for the perch.


Trying to stick with my love for Earth, I went outside and found a broken off twig lying on the ground, and used it for the bird perch.

It was time to break out the hot glue gun. 

I glued everything in place, and even used the large plastic piece I cut out for the opening as an awning.


Collecting a few things from past projects, I got started on decorating, gluing things here and there.  I even kept the lid intact for future use.


To make the hanger, I punched holes in the sides, slid my hemp rope through them, and tied knots to secure the string inside.  I also covered the knots in hot glue for extra stability.


When everything was in place, it was a little front heavy, so I glued a couple rocks toward the back on the inside.


In no time at all I had a new birdfeeder that was made from something that was moments away from going in the trash. All it was missing was the seed.


Happy Earth Day, everyone!


What did you do this year to take care of our planet?

There are so many things that can be done, and not just one day out of the year.

Plant something.

Pick up trash.

Recycle.

Make a compost.

And so much more!
Until next time…

Happy DIY-ing!!!

Monday, April 11, 2016

Double Chocolate Banana Minis


I did something this week that I haven’t done in years!  I entered into a weight loss competition.  I’m thinking this is just what I need to get my but in gear and be ready for swimsuit season. 

Now, even though it’s crunch time, there are times I can’t curb my craving for chocolate.  Sometimes it’s a necessity!

My brain immediately went to a recipe I found from Yammie's Noshery when I needed something new to do with my ripe bananas.  A few tweaks, and bam… a quick little snack that helps tame the chocolate dragon inside of me.

Double Chocolate Banana Minis
You need:
3 ripe bananas
1 egg
¼ cup brown sugar
1/3 cup applesauce
1 tsp vanilla extract
6 Tbsp Hershey’s Special Dark Cocoa
1 cup flour
½ tsp baking powder
1 tsp baking soda
½ tsp salt
2/3 cup Chocolate Chips (optional)


Preheat oven to 350 degrees.

Mash the bananas.

Combine all the wet ingredients in a bowl. (Bananas, Egg, Brown Sugar, Applesauce, and Vanilla)


In a different bowl, combine all the dry ingredients. (Cocoa, Flour, Baking Powder, Baking Soda, and Salt)


Slowly mix the dry ingredients into the wet ones, stirring as you go.


Once all ingredients are mixed together, now’s the time to add the chocolate chips, if desired.  Mix them into the batter.


**I used milk chocolate chips to sweeten the minis a little more.  To me, sometimes too much dark chocolate can make food bitter.**


Time to break out those mini muffin tins.  Spray with non-stick cooking spray and spoon in the batter.


**This recipe makes 42 minis!**

Cooking time varies depending on the consistency desired. 

For brownie like minis, cook time is 13 mins.  For cake like minis, cook for 15 mins. 

**Remember, mini muffins cook faster than bigger ones.**

Check minis with a toothpick to see how done they are.

Take them out of the oven and let cool before removing them from the tins.

The moment of truth…

The taste test!


******************Family Verdict******************

4 out of 5 of us really enjoyed them.  My ten year old son’s not a fan of dark chocolate, so I knew it was going to be iffy for him. 

Hubby’s comment, “They’re so rich, I like that they’re smaller bites.  I think it would be too much if they were bigger, but this size is perfect.”

************************************************

These little things, as is, are only 45 calories a piece.  There are so many more things you could do with them too.  Maybe some mint pieces instead of chocolate chips, maybe some protein powder, or even switching the type of flour. 


I know I enjoyed these, and plan on making them again soon.  They were perfect for when my husband and kids grab their sugar snacks.  Then I can have my little bit of chocolate as well, and not worry about messing up my “trying to be healthier” lifestyle.


Eating right and exercise… Every time I think of that last word, I cringe, but then I laugh when I remember this…

Wait for it...

I wouldn’t put it past me to do the same thing!

Be sure to follow me, so you can find out my success, what I used… and if I truly ever fell on my face while working to get there.   

Until next time…

Happy DIY-ing!!!

Tuesday, April 5, 2016

Bacon Patty BLT


It’s finally here!  It’s that time of year where there’s no more excuses, and it’s time to start eating right.  It seems like every month there is something to hold us back.


October:
All that yummy Halloween candy that we have to “check” and “make sure it’s safe” for our kids…
November:
It’s hard to start now.  We think, why start now, when all that delicious Thanksgiving dinners are right around the corner…
December:
Hello!! It’s Christmas time!  Its cookies, candy, big family dinners, and more.
January:
New Year’s!
February:
Valentine candy and chocolates!
March:
St. Paddy’s Day!
Then, Easter! What’s Easter without Easter candy?

Ugh! It’s an endless cycle.  However, here’s a reprieve.  There’s no pressing food holidays, and summer is right around the corner.  Like I said… “It’s time!

Time to take care of ourselves.  To help with this, I’m going to share how to make my deliciously special BLT. 


However, to make it, you have to know how to make a Bacon Patty. 

Let’s get something strait!  I LOVE bacon!!  Yes, I know bacon is not ideal for healthy eating, but I have learned that smaller portions of the things you love, with healthier additions, helps a person stay on track.

First things first…

Preheat oven to 400 degrees.

Get a cookie sheet and cover it with foil.


Take out 3 pieces of bacon and cut them in half.


**Now, I have tried this with Turkey Bacon.  It will work, and it did save me 50 calories per sandwich, but because of the toughness, I wasn’t a fan.** 

Place three half pieces, and lay them in a row, touching. Then take the other halves and weave them in an over/under pattern with the three laid out pieces.  This will give you a square shape of bacon.


I usually make four at a time, therefore I have some made in advance.


Place a cooling rack over the top of your uncooked patties. This helps to keep them flat when they cook.

Cook in the oven for 18 minutes, or until desired crispiness is achieved.


Pull them out and let cool some.  **Careful! Bacon grease WILL be hot!!**

 
When your patties have cooled enough to handle, place them on a paper towel covered plate.  Take another paper towel and blot up the excess grease.


Bam! Bacon Patties…


These can be used on any type of sandwich, including the all too known, Bacon Cheeseburger.  However, I store three out of the four in the fridge for later days, and use one for my delicious tasting BLT. 

Here’s how…

I first toast my 100% Wheat Sara Lee Sandwich Thins.
 
**Here’s a fun trick I learned… To toast the outside of bread, but leave the inside warm and soft, place the two pieces of toast in the same toaster spot.  This is so ingenious, I don’t know why I hadn’t thought of it before.**


When that’s done, I layer my bacon patty, green leaf lettuce, and two slices of tomato.  I put one serving of Light Mayonnaise on the top bun, and top off the sandwich.

Depending on my mood, I might throw a little avocado in the mix, but I always resort back to my original style. 


It’s simple, it’s easy, it’s good for you, and I can’t get enough of them!!


If you think you know of a better tasting BLT, comment below! If you dare... LOL

I would love to try and compare, and you can do the same.

Until next time…


Happy DIY-ing!!!