Happy New Year, everyone! I am so excited to share this post with you!

I knew it was going to be hot, and there was going to be a lot of people so I didn’t want to take my big knit purse that’s made to carry every Mom essential you can think of. However, I didn’t have a small purse and I couldn’t find one around the stores to fit my style.
When I got home, I still looked for one, but nothing was exactly what I wanted. Then, I found “the post”, and a light bulb went on.
Items needed:


How
to Paint and Decoupage a Purse

So this summer my husband and I took a much needed
vacation by ourselves. We ended up going up to his home state of Minnesota, and
went with his sister and brother-in-law to the Minnesota State Fair. Oh my!
That was a first for me. I ate so
many things, some for the very first time.
Gator Sausage (delicious by the way), fried green tomatoes, fried pickles (hubby's fav!), and let’s
not forget falafel (Yeah… not my favorite, but now I know).


I knew it was going to be hot, and there was going to be a lot of people so I didn’t want to take my big knit purse that’s made to carry every Mom essential you can think of. However, I didn’t have a small purse and I couldn’t find one around the stores to fit my style.
When I got home, I still looked for one, but nothing was exactly what I wanted. Then, I found “the post”, and a light bulb went on.
 |
| DIY Decoupage Floral Bag |
I started to peruse all the local thrift stores, until I
found a small purse to fit my needs; small, brown leather, and a long strap to
sling around me. Best part… it was only
$2. Here’s how I made it mine…
Items needed:
Purse
Tape
Craft Paint (I used Acrylic)
Paint Brushes
Fabric
Scissors
Mod Podge (the most genius crafting essential ever!)
I started off by looking at the purse and
figuring out where I was going to paint.
Then, I taped off all of the hardware that I didn’t want paint to get
on, or that would potentially get in the way.

Then I started to paint. And paint… And paint some more… Fair warning, it’s going to take a lot of
coats for full coverage.
**Careful not to get any paint of the fabric
next to a zipper. It won’t come off.**
**Helpful Hint: If you
have edges that are close, bulk up the purse first, stuff it until the edges
pull away from each other. That way,
when all is said and done, once you load up your purse, paint won’t pull off
because it was stuck to an edge. Yes, I
am speaking from experience, and therefore I had to touch-up a couple spots.**
Once the purse was painted everywhere that I
wanted and dry, I pulled out my fabric.
Now, the tutorial I got this from used a floral print. It was very pretty and eye catching, but I’m
just not a flowers kind of girl. Therefore,
I pulled out my zebra print.

When you get the fabric you want, cut out what
you are going to use and lay it out on the purse to get the design.

Take out your trusty Mod Podge and use it as
an adhesive. Use a paint brush and brush
it onto the back of the fabric. Flip it
over and lay it where you want it to stay.
Once everything is where you want it, now it’s time to seal. Just start brushing the Mod Podge over the
glued fabric and where you painted, covering everything.
**If you haven’t used Mod Podge before, just
know that it goes on white, but dries clear.
It’s okay, don’t freak out!**
You are going to need a few coats, just enough
to where you can tell that the fabric won’t pull off unless it’s dug up intentionally. Make sure to give the Mod Podge drying time
between coats.
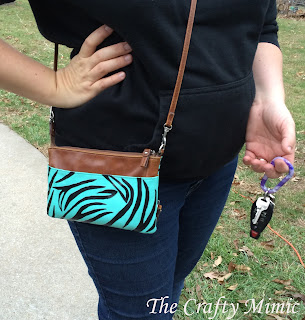
Once it’s dry, take off the tape, wear and
enjoy!

I hope you enjoyed this post, let me know what you think, or if you have any other helpful tips. If you do try this out, be sure to send me a picture of the final result. I would love to see it.
Happy DIY-ing!


I hope you enjoyed this post, let me know what you think, or if you have any other helpful tips. If you do try this out, be sure to send me a picture of the final result. I would love to see it.
Happy DIY-ing!
No comments:
Post a Comment