Saturday, March 12, 2016

Leprechaun Loot... with a little extra poop


So when I was twelve, there was another girl in my school with the same last name as me. I mean, the nerve of some people! {LOL} Of course I had to find out who this girl was.  Apparently, she was wondering about me too.  We met each other and we’ve been great friends ever since. 

Because of our same, very Irish, last name, we always considered St. Patrick’s Day as OUR holiday. 

We grew up, had families, and moved away from each other, but she is always on my mind this holiday.

For this St. Patrick’s Day, I wanted to make a fun little gift to send her. 

I thought how my friend is surrounded by boys, and that brought my thoughts to my youngest son and how he gets a kick out of the weirdest things.  That gave me an idea…

Leprechaun Loot… with a little extra poop”


This is so fun and easy to make!
Get a bottle or jar.  I took one of my empty Starbucks Mocha Frappuccino bottles, and pulled off the labels.  To get the sticker residue off, I used the great peanut butter method.


Fill half the bottle with the loot (AKA: Rolos).


Oh No! A wrapper defect!  Whatever shall I do? Oh wait… Got it…


Then, add the poop (AKA: Green Mint M&Ms)


Cover the top and shake, shake, shake it up!


Keep adding and shaking until the bottle is completely full.


Once the bottle was filled, I spray painted the lid green and made cute little labels to finish it off.


There you have it!  Leprechaun Loot… with a little extra poop.


***After a couple days, the contents of my bottle either settled or little leprechauns (AKA: my kids) stole some candy.  Either way, I had to add more, so be sure to keep extra candy around, just in case.***

I know my friend will absolutely love this, as well as her house full of boys. 

Is it just my family, or are ALL boys obsessed with “hilarious” farts and the mention of poop?

How do you like this idea for a gift?

Comment below to let me know!

I’ve got more St. Patrick’s Day things coming your way, so stay tuned.

Until then…

Happy DIY-ing!!!


St. Patrick's Day Fact from Global News...

Shamrocks are not Irish.
"Most clover species grow throughout Europe.
There may not be anything uniquely Irish about shamrocks themselves, but stories suggest St. Patrick used the three-leaf clover to explain the religion’s holy trinity of the Father, the Son, and the Holy Spirit."


For more facts you might not know, click here.

Wednesday, March 9, 2016

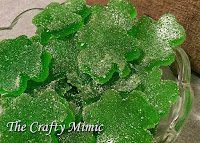
Lime Shamrock Gummies


It’s almost St. Patrick’s Day!  You know what that means… Green, green everywhere!

I’m going to let you in on a little secret… I LOVE St. Patrick’s Day.  For as long as I can remember, I always have.  When I was younger, my grandparents would throw these great parties, where everything was green.  Everyone was smiling, and having a good time.  That was more than likely from all the green beer, but to a kid, it felt like magic.

Since becoming a mom, my celebrating has definitely changed from when I was single.  No more parades, and no more green Jell-O shots.  Now it’s all about making sure that my kids wear green to bed the night before so their daddy won’t be able to pinch them first thing in the morning.  It’s getting to break out the St. Paddy's Day clothing and dressing as green as I want for 1 day only.  It’s warding off my kids pinches even though I’m wearing green, then retaliating when they finally get me.  Last, but not least, it’s the food.  The special foods made and reserved for only this time of year. 

First on my to do list this year was homemade Shamrock Lime Gummies.  Let’s think of these as the St. Patrick’s Day Virgin Jell-O Shot.


When I found these online, Homemade Gum Drops - A Mitten Full of Savings, it made me remember the old times, but something that was brought to today, for my kids and me. 


Here’s what you need:
Small Shamrock Cookie Cutter
2 cups Sugar
2 packets Unflavored Gelatin
1 ½ cups Applesauce
2 boxes of Lime Jell-O

  •      The original recipe called for 3 oz each, but I’m pretty sure that was just a typo.  The boxes need to be 0.3 oz each.


  • I used Sugar Free Jell-O.  This was going to my kids, and I figured there was already enough sugar in the recipe, they didn’t need more.

First, combine all ingredients in a saucepan.


Mix them all together.


On medium heat, keep stirring until the sugar mixture starts to boil. 

~ 

**This is where I kept thinking about Dory from Finding Nemo.**


Once the mixture is boiling, let it boil for around a minute. 
**Be careful! Sugar boils at a much high temperature than water and if touched, it is harder to get off your skin than a shake of a wrist to get hot water off.  Be Careful!!**

Once you’ve let the gelatin and sugar mixture boil, carefully pour it into a greased 9x13 pan.


Next, stick it in the fridge until the gelatin sets.  I waited around 2 hours.

Before you take out your mold, pull out a cutting board and dust the top with sugar.


Gently pull your gelatin mold out of the pan.


**I used a butter knife and ran it along the edges of the mold to help loosen it from the pan.**

Flip it onto the sugar coated cutting board, and dust the top of your mold with sugar as well.


Bring out your shamrock cookie cutter, and start cutting.

 
Okay, now I’ve got to be completely honest.  I had a bit of a problem here.  My mold wasn’t completely hardened in the middle when I took it out of the fridge.  This is when I found that out because the mold was starting to stick to my cutting board and absorbing all the sugar I had dusted the cutting board with. 

I quickly cut all the shamrocks in the mold and took a spatula to get them off the cutting board.


Once I got them off, I placed them on another cutting board and re-dusted them with sugar.  Then, I stuck them back in the fridge for another thirty minutes.  Crisis adverted!

Bam! We had a cute little collection of homemade gummies.  Better yet… shamrock gummies!


Now I was stuck.  I had no idea how to store these things, so I did a little experimenting.  What I found was that these can be stored in the fridge or out of the fridge.  So there are no worries that you’re going to wake up and find green goo at the bottom of a bowl because your shamrocks melted when you stored them on the counter.  Yes, the thought had crossed my mind…  Just make sure they are stored somewhere airtight so they’ll stay fresher, longer.


*****Family Verdict*******

Most of us, me included, thought they were okay.  We’re not very big on lime flavored things though.  We all thought that strawberry would make for a better flavor.

However, this did not include my 15 year old boy.  He couldn’t get enough.  He even ate the remnants that were left over from cutting the shamrocks.  They were a BIG hit with him.

I think it boils down to flavor preference is all. 

************************

So I think this was a fun thing to start off this St. Patrick’s Day holiday. 

These would be perfect little treats for any party, or just something to get your family excited for the holiday. 

My kids are already planning how to ambush me that day.  This should be interesting…

Comment below and tell me what you think of this festive gummy!

What is YOUR favorite Jell-O flavor?

Stay tuned for more DIYs to celebrate St. Patrick’s Day!

Until then…

Happy DIY-ing!!! 


St. Patrick's Day Fact from Global News...
"Dublin Airport is offering words of wisdom for North American travelers explaining that “St. Patty’s Day” or “Patty’s Day” are not to be used. The reason? Patty is a nickname for Patricia, and Saint Patrick was—as you may have gathered—not a woman named Patricia.
So get out the double D’s: St. Paddy’s Day works because it comes from Padraig – a version of the Irish name Patrick."

For more facts you might not know, click here.


Wednesday, March 2, 2016

My Little Grinch and Daisy Head Mayzie; Dr. Seuss Day!


Happy Birthday Theodor Seuss Geisel!!
**Better known as, Dr. Seuss**

“You’re never too old, too wacky, too wild, to pick up a book and read to a child.”

Yes, it’s that time of year again.  A time to celebrate an author that has brought us so many GREAT children’s books.  Books like the classic “Cat In The Hat” or “One FISH Two FISH Red FISH Blue FISH”, and of course no one can forget “The Grinch Who Stole Christmas”!  There are so many books, with so many unforgettable rhymes and characters.

How do schools celebrate this day?  By dressing up as your favorite Dr. Seuss character and serving Green Eggs and Ham of course!

I have had so much fun with this the last two years. 

Last year my son wanted to go as the Grinch.  No matter how much I tried to talk him out of it, because the Grinch is so much harder than some of the other characters.  He was adamant though.  He had to be the Grinch. **Keep in mind, this was three days before he needed to be dressed up.** 

That was it.  The gauntlet was thrown down, and it was either go big or go home.

I first started on the outfit.  I turned a plain white t-shirt into the Grinch’s classic ugly sweater using a freezer paper stencil and acrylic paint.  Then I stuck him in kakis and put a red long sleeve t-shirt underneath the Christmas tree t-shirt.  Bam! Done.

Next, came his head.  My husband spiked his hair, and I used hair color and sprayed it green.  Then after hours of watching YouTube videos on how to paint the Grinch face, I thought I would give it a shot.  (Click here for the one that helped me the most.)  Even though I didn't have all the colors she did, I had a great time painting his face.  I never knew it could be that fun.


Overall, I thought that it came out great and he turned out to be the star of the Whoville crowd in his classroom.  It was so much fun seeing him transform from my cute little boy into a scowling green Grinch.


“Sometimes you will never know the value of a moment until it becomes a memory.”

Now, for this year…

It was my daughter’s turn. She’s young enough that it was more up to me than her on what she was going to be.  I didn’t think she would be a fan of the face paint, so I went in search of something cute but different.  That’s when I started to see all these girls with a flower growing out of their hair.  That’s when I got introduced to Daisy Head Mayzie. 

Her look was simple, just a pink dress with white ruffles.  Oh, let’s not forget the daisy coming out of her hair.

Believe it or not, my daughter did not have a pink dress anywhere.  She’s more of the jeans and boots type, so dresses are somewhat scarce around here.  I did find her pink tutu that her older brother gave her for her birthday last year.  Now all I needed was a plain pink shirt. 

I went and bought a cheap pink shirt, some white felt, wide white ribbon, a fake daisy, and a headband. 


When I got home, it was time to put it all together. 

I first sewed the white ribbon around the band of the tutu, leaving two long strips in the back to tie them into a big white bow.


Then I cut ruffles out of the white felt and sewed them around the neck and arm holes.


Paired with white tights, a small pair of pink shorts underneath the tutu, and pretty shoes, her clothes were done.


Now for the daisy.  I had no idea how I was going to get the flower to stay on the headband.  I cut the stem down and stripped it until the wire was free. 


I then tried to wrap it around, but couldn’t get the wire securely around the band so the flower wouldn’t move.  That’s when my husband stepped in, and said he would take care of it. 

I leave the room, and when I come back, he had drilled a hole in the middle of the headband, stuck the wire through, and tightly wrapped it around the headband.  That flower was not going anywhere!


It was headband against man, and man prevailed!! Thank you, Hun!

After that was finished, her outfit was done.  She did need clips around her headband so it would stay on her head, but you could barely see them amongst her hair.

“Why fit in when you were born to stand out?”


She was so cute! When we got to school, she was shy and didn’t want to go in her classroom, but once she heard that a lot of her friends had crazy hair and clothes on too, she was all for going in.  It was a great day for her.  My only wish is that she would have at least TRIED the Green Eggs and Ham!  Maybe next year…

**Helpful hint: I have to say how much better it was to sew an outfit instead of using hot glue or paints.  When my daughter was done being Daisy Head Mayzie, I just seam ripped through the outfit, and her tutu was back the way it came, and she had a new pink shirt to wear whenever she liked.**


So, I need to know… Who is your favorite Dr. Seuss character?

Do you like Green Eggs and Ham, Sam I am?

Comment below, and let me know!

Until next time…


Happy DIY-ing!!!


“Don’t cry because it’s over.  Smile because it happened.”

Monday, February 29, 2016

Loveable Cherry Pie Heart Pops


It’s the last day in February, and so what am I doing? I’m giving you one… last… hearts and flowers post.  Well, more hearts than flowers. 

As I was browsing Pinterest for Valentine DIYs, I saw cherry pie pops with hearts cut out of the middle. 

I thought it would be cute to go one step farther, and make the whole pie pop into a heart.  Here’s how I did mine…


Items needed:
Pie Crust
Pie Filling
Lollipop Sticks
One Egg + water
Sugar
Chocolate Chips (optional)


First, preheat your oven to 350 degrees.

Then, roll out your pie crust.  To save time, I used store bought, but there’s nothing that says you can’t make your own. 

Next, take your heart cookie cutters, and start cutting the dough.  I used a 3” heart, but left room for four 2” hearts as well.


When I had them all cut and laid out, I had enough to make five 3” pops and two 2” pops.


It’s time to spoon in the pie filling.  Not too much, or else it will seep out the sides when you place the heart on top.  Mine was mostly the liquid, but I made sure all the bigger pops had at least one cherry inside. 


When you’re done placing the filling on the hearts, make sure it’s back from the edge, close to ¼”.  This is so the two hearts will stick together without interference. 


Next, place the lollipop sticks on top of the filling.  Make sure to put the end close to the top, so the cherry pie pop won’t fall off when you pick it up. 


This is when I went a little crazy.  I wanted the little pops to be something different, something to take people by surprise.  That’s when I remembered the chocolate covered cherries that we give my in-laws for Christmas every year.  To be adventurous, I put chocolate chips in with the cherry pie filling on the smaller hearts.


Next, make your egg wash; one beaten egg and a splash of water.

Then brush the edges of all hearts with the egg wash, before placing one on top of the other.
 

Some filling may come out, but that’s no big deal. Wipe it up and move along.


To press the edges of the hearts together and give them that little extra flare, take a fork and push it into the crust around the edges.


Place pops on a parchment paper covered cookie sheet to prepare them to go in the oven.

For the final touches, brush tops with egg wash and sprinkle with sugar. Then cut a small “X” on the top of each one.


Place in the oven and bake for around 20 minutes.  Every oven is different, so be sure to check on them when the time gets close.

Take them out and enjoy.

These pops were so cute, and the perfect little treat to show my family how I love them with my “whole heart”.


*******Family Verdict************

Hubby & I:  We both thought that it needed a stronger tasting filling since there wasn’t that much in them.  We also agreed that Apple Pie would be delicious in the hearts.

10 year old: He said that I hit it out of the park with the chocolate ones.

6 year old: He wouldn’t stop eating them to tell me what he thought.

4 year old:  She decided that she didn’t like the color red that day, so she wouldn’t even try them.  She doesn’t count.

********************************

What do you think of this idea of pie on a stick?

It seems like SO many foods now a days are on sticks.  What is your favorite food on a stick?

As always, comment below.  We’d love to see your opinions.

Until next time…


Happy DIY-ing!!!