Monday, May 30, 2016

Broadening Family Horizons; May 2016; Cabbage Soup


As most of you know, I’ve been trying to lose a few pounds.  I was browsing one of my health food apps when I found a video for Peel-a-Pound Soup.  It looked so good, and apparently it’s magic for weight loss. There’s one problem though.

Cabbage!

Cabbage has never looked appealing to me, my kids haven’t had cabbage, and my husband has adamantly declared his hatred for the stuff.

I decided to try it anyway, and not tell anyone what was in it until after they tried it.  I know, that’s so bad. HeHe! 

Ingredients needed:

1 head of cabbage
1 large can of whole tomatoes
1 packet of Lipton onion mix
6 beef bouillon cubes
3.5 cups water
1 red onion
1 yellow onion
1 green bell pepper
1 red bell pepper
½ celery stalk
6 garlic cloves


Chop up your colorful array of vegetables.


**Yes, it’s a lot of ingredients, and it took a while to cut everything up.  Downfall!**

Find a big pot! I used our canning pot.

Dump in the tomatoes, and get a little messy by squishing them apart. **This was fun!**

Now add in everything else, but save the cabbage for last.  You might have to add in the cabbage in portions when some cooks down, depending on the size of your pot.

At this point I got a little worried.  It looked as if the soup was going to be mostly raw cabbage.

Thankfully it cooked down, and when it did it smelled great!


******************FAMILY VERDICT********************

This soup was a big hit.  All but 1 person that tried it thought it tasted good, and my son was the odd one out. Yes, the husband that proclaimed to hate cabbage even thought it was good.

I liked it, except that it left me still hungry and wanting more food.  There wasn’t enough protein in it for me. Which is okay if you have great self-control.  However, when I’m hungry, I want to shove as much food in my mouth as I can.  All I could think was that it needed some chunks of beef.  That would have made it perfect.

*****************************************************


To watch it made, here is the original video that I found. T-Roy Cooks, Peel-a-Pound Soup

His directions were so easy to follow.  However, he states that you burn more calories by eating the soup than you consume.  That’s a bit of a stretch, but one serving is low on the calorie count.


Overall, I’m glad I made this.  My family got to experience cabbage soup and it abolished some misconceptions that we all had about cabbage.

My family’s been so good about trying these healthy new things, I think I might treat them to a dessert next month.  Only time will tell.

Until next time…

Happy DIY-ing!!!

Friday, May 27, 2016

Charcoal Peel-Off Face Mask


Just recently we had a weekend that was filled with soccer games.  I LOVE to watch my kids play! I love the excitement and intensity of it all. 


However… A person’s face really takes a beating in the sun, wind, and numerous other elements.  When we got home on Sunday, after two days of games, my face felt horrendous.  It was gritty, rubbery, and just made me feel dirty. 

I remember researching peel off masks, and figured it was the perfect time to try one. 

It's time to get up-close and personal...


This mask was so simple to make, and only 4 things were needed.

2 oz. Elmers Glue (Yes, the same stuff you used in elementary school and would rub all over your hands… Ok, well I did that anyway.)
4 Activated Charcoal Capsules
A brush, and a bowl


**Why use charcoal?  I thought it was just to give it the black color, and you could better see what was pulled off.  I was so wrong!  Activated charcoal is used to draw out toxins in your body.  It can “adsorb” thousands of times its own weight of harmful substances. The toxin binds to the charcoal, and when the mask is peeled off, so are the toxins from your face. Click here for more facts about activated charcoal.**

First things first, pour your glue into the bowl.  I used a disposable bowl which made clean-up easier.

Pull apart the capsules and dump the charcoal into the glue.  This was a little harder than expected.  You would think that they would just pull apart.  No such luck! They broke, one slipped out of my fingers and landed in the glue, and it got a little messy.


Ok, a lot messy!


Use the brush and mix it all together.  You want the glue to be at a watery consistency to where it “slimes” off the brush.


Take off all makeup and prep your face.  Wet a rag with warm water and drape it over your face.  This is to open the pores and make it easier for the mask to reach everything.

Yep, that's me under there...

Time to do a little artwork! Take your brush and just start painting your face.  Be sure to avoid all hair!


I was only going to put it on my problem areas, but when I was working, I realized that my problem areas were most of my face.  So I just covered it all!

                                                                                                                                                                                                                                                                              
**Careful for drips.  It stains.**


Let it dry.  This took around 30 minutes. 


One little spot on my cheek still was a little tacky after the 30 minutes, but I have a special tool for this…


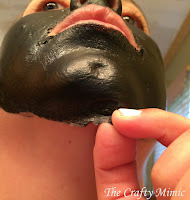
Yep, a minute using my trusty hair dryer, and the mask was completely dry.  It had a matte look to it, and my face was stuck in place.


Starting from the bottom, slowly peel it up and off your face.


I had heard many people say how painful it was.  Not to me.  It was like any other peel off mask.  That was until I got to my eyebrows.  I got too close with my mask and covered some hair.  Let’s just say that I got a facial and my eyebrows shaped, all in one swoop.

It was great though.  I’ve never had a mask come off mostly in one piece before.  It left a few pieces here and there, but nothing a wet rag couldn’t handle.


There, it was done, and I had survived the DIY Charcoal Mask.  It was time to inspect the results.

I looked down at the mask, expecting to see all these white little pieces that were pulled from my pores.  There were none!  That was a little disappointing because I know that they’re there. 

However…. And this is a big HOWEVER!

My face felt amazing! It was smooth, it no longer felt gritty or rubbery. The bottom of my cheeks did turn red.  I'm assuming it was from the peach fuzz hair that was once there.  Not a problem.  I used a good moisturizer, and within the hour it was better. 


I know it’s hard to tell the difference between the before and after pictures, but there was a definite change in the feel. 


It gave me a whole new sense of energy, and it was just what I needed after the full soccer weekend. I definitely see myself doing this again; mess or no mess…

Have you ever used activated charcoal for anything?

What is your favorite peel off mask?

Comment below to let me know!

If you enjoyed this, take a look at how I used activated charcoal to whiten my teeth!

Until next time…

Happy DIY-ing!!

Wednesday, May 18, 2016

Male or Female? Determining the sex of a cat...


Meet Kiki!


This tabby showed up on our doorstep almost four years ago.  It wasn’t the first time an animal had shown up at our house.  We live in the country, and that’s where people primarily dump their unwanted animals. It’s sad, but true.

This cat was older than a kitten, but still quite small. At first we did nothing, but when it wouldn’t leave, we started to feed it little things here and there… so it wouldn’t starve.  The next thing we knew, it took up permanent residence on our deck.  That could have also been from all the love and attention it got from my kids. 

My husband then checked under the tail, and declared, “Yep, it’s a girl.” So “Here kitty kitty,” slowly turned into “Here Kiki,” and that’s how she got her name.

She stays outdoors, never chases mice, never grooms herself, and was content to just eat, drink, and be brushed.  She’s our lazy country cat.    

Just recently, she got really sick, and we had to take her to the vet.  The first thing the vet tech did was lift up Kiki’s tail and she said, “Oh! Well he was someone’s at one point because “she” is a neutered “he”.” The entire visit went by, and I was still reeling. “Holy cow!! Kiki’s a boy!”

The vet even said he looked like a boy.

What!?! I had no idea that the sex of a cat could be determined by its looks.  I knew I had research to do. 

With as many animals that come around my home, I thought it might come in handy… and what a good bit of information to pass along. 

Here’s what I found…

Different ways to determine the sex of a cat:

Genital Check:

The sure fire way is obviously to lift up the tale and look.  **Make sure they are comfortable, because they won’t like you looking.** If there are no visible testicles, look at the distance between the genitals and anus.  A male will have a greater distance between them than a female. One and a half inches (give or take) compared to a half an inch (give or take).

Coloring:

Calico or tortoiseshell colored cats are most likely females.


The color of a cat’s fur is determined by the X chromosomes.  To get the calico coloring, a cat needs 2 X chromosomes.  For a male cat to have the calico or tortoiseshell coloring, he would need to have two X chromosomes along with the Y chromosome that makes him a boy.  This would most likely make him sterile.

While calico and tortoiseshell colored cats are most likely female, more orange or ginger colored cats are male.


Face Shape:

After research upon research, this is what I found.  Determining the sex of a cat from their face is not an accurate way to find out.  Once a cat is spayed or neutered, the difference between them becomes very small, if not nonexistent.

When a male is neutered before 6-7 weeks old, it can cause them to have taller/skinnier faces. 


Unneutered males, or ones that were fixed when they were older develop jowls.  This gives the bottom of their cheeks a fuller look, and causes their faces to appear square.
 

Males also seem to have an aura about them that puts off the message, “Don’t mess with me.”


Females tend to have a shorter and more rounded face.  The tops of their cheeks, or cheekbones as I call them, are fuller and that’s what gives them the more rounded look.


Nipples:

There is a myth that only females have nipples.  That’s not true.  Male cats can have nipples too, but there is no function to them, kind of like the nipples on a man.  Females will have more though, around 6-8.

Behavior:

Males tend to have a more playful behavior.  Non neutered males tend to be more aggressive.  They like to roam, and could even be gone for a day or two.  Males like to mark their territory by spraying their surroundings with strong-smelling urine. **I have also found this to be true for neutered males as well.  If they like it, they mark it.**

Females tend to be more stand offish toward strangers than males, and are less likely to spray their surroundings.   


So now we are nursing a cat back to health and hoping he gets better.  I’m afraid that he’s stuck with the name Kiki though.  It’s been hard enough trying to remember to call him a he, a new name is out of the question. 

I hope this information helps future cat owners if they have a stray wander up to their home that becomes part of the family.  That way any Mr. Cuddles or Ms. Priss will have a correct prefix. 

Has this ever happened to any of you?

What is the strangest name for a cat that you’ve ever heard?

Until next time…


Happy DIY-ing!!!

**All photos, except for my Kiki, are cats waiting for owners at Wayside Waifs, a wonderful animal shelter that really cares for all furry friends that pass through there.**